Hello Fellow Eaters,
After some consideration, I have decided to move my blog to WordPress. Thank you to all those who advised me during this transition. I have enjoyed my time on Blogger and, no worries all of my old posts, my wonderful readers, and their sweet comments will be transferred as well. So, don't forget to check out my blog (and let me know what you think) at it's new location! I look forward to seeing you all there. [Oh and please bear with me as I tweak the new site to make it more enjoyable for you all to read] Pass on the word!
Much love,
TFFG
About Me
- TheFriendlyFoodieGirl
- I'm a foodie and an amateur chef. I love to cook and to learn all I can about food! I believe that food is very powerful. It can bring people closer together, and it can also destroy relationships. I'm serious! P.S.- I can't stand doing the dishes!
Friday, July 1, 2011
Monday, June 20, 2011
Strawberry Sunshine

Strawberry Sunshine is the name that I came up with for this dish, because honestly, that's what it tastes like to me. Strawberries and Sunshine. It makes me happy.
It's a hot summer and I love to have cool refreshing items on my menu. This is a no cook recipe and a great side dish to take on a picnic or to eat with a light summer brunch. It's easy to make and to modify. Don't have blood orange olive oil? Use a bit of orange zest and some regular extra virgin olive oil! Have a lot of people coming? You can easily double, triple, or quadruple this recipe! It's okay if it stays out for awhile and once it's in the fridge it stores quite well.
Making this recipe has become a must whenever we have strawberries in the house. My favorite way to eat it is by itself as a side salad of sorts, but it’s the perfect accompaniment to lunch, alongside a sandwich or on top of a salad. I have even used these strawberries in making a dessert. It travels well, as long as you have a container with a tight lid. I’ve packaged it up to send to work with a friend of mine, before, as part of her lunch, no problem.
The sweet crispness of the strawberries and fresh herbs, the hint of orange, and the tanginess of the white wine vinegar is refreshing and always leaves you, and everybody else wanting more…so make extra!
Get the recipe and check out other recipes on Food52 !
Friday, May 13, 2011
Sunken Southwestern Fajita Pie
Hello again Fellow Eaters,
I hope you all are eating well!
I believe .....that I am an inspired cook (as I believe that most, if not all, cooks are). I can often look back on my recipes and figure out what, or whom in particular inspired me to think up a specific dish. Sometimes it's the music that I'm listening to that inspires me, or a movie that I have watched recently. Sometimes my recipes can be related to what I was feeling at the time, or to what the weather is like outside. Even books inspire me! Other times I can tie a recipe back to a childhood memory, or to a person in my life, especially when it comes to my friends and family.
I owe the concept of this recipe to my dear friend Nicky's mom, Mrs. C! Back in middle and high school, Nicky used to have get- togethers at her house and Mrs. C would feed us WELL .. (that woman can COOK!!). On those evenings (and many times in between) we also got to have tons of girl talk, advice from the wise Mrs. C, and lots of chocolate!
For my "Going- Away- to- College Party" Mrs. C made her taco pie for dinner.
I have never forgotten that pie and so some weeks ago, when I was faced with leftovers from a cookout (many many hamburgers) I decided to make my own rendition. I already had bell peppers, onions, and garlic chopped up from the day before so, I cut up the hamburgers (I would estimate that it ended up being 1.5 lbs of meat), grabbed 2 boxes of cornbread mix, 2 cans of beans ( I used black or kidney beans). The first thing I did was to make the cornbread batter and bake it until the edges were mostly firm but the middle was still quite soft. While the cornbread was bakng, I sauteed the bell peppers, onions, and garlic in olive oil. I added some salt, pepper and chili powder. In a large bowl I tossed the beans, the cut up hamburgers, and the sauteed mixture. When I took the cornbread out of the oven, I poured everything into the center of the cormbread (the softest part) and let it sink. This creates a crust of sorts around the edge. I topped the whole thing with some grated cheddar cheese and popped it back into the oven until the cheese was melted the filling was bubbling. I topped it with some sour cream, and served it up. A side salad goes well with this dish, and is a great way to add some color, and some more nutrition to this meal.
I hope you all are eating well!
I believe .....that I am an inspired cook (as I believe that most, if not all, cooks are). I can often look back on my recipes and figure out what, or whom in particular inspired me to think up a specific dish. Sometimes it's the music that I'm listening to that inspires me, or a movie that I have watched recently. Sometimes my recipes can be related to what I was feeling at the time, or to what the weather is like outside. Even books inspire me! Other times I can tie a recipe back to a childhood memory, or to a person in my life, especially when it comes to my friends and family.
I owe the concept of this recipe to my dear friend Nicky's mom, Mrs. C! Back in middle and high school, Nicky used to have get- togethers at her house and Mrs. C would feed us WELL .. (that woman can COOK!!). On those evenings (and many times in between) we also got to have tons of girl talk, advice from the wise Mrs. C, and lots of chocolate!
For my "Going- Away- to- College Party" Mrs. C made her taco pie for dinner.
 |
| Sunken Southwestern Fajita Pie |
Thank you to my dear friends Nicky, and Mrs. C, for their many (many) years of loving friendship, encouragement, good advice, and for feeding me marvelous food on many occasions! I love you both!
Friday, March 18, 2011
BLTs and ETAs
We've gotten into a habit and we like it. Brunch has become a "thing" for me and my two roomies. Usually, it involves some kind of familiar, or well loved food with a twist! We can't do it everyday but we try for at least once a week.Although we run on different schedules we can usually catch each other somewhere between 10am and 2pm and grab a peaceful bite to eat before our day swirls on.
Around the middle of February we had an impromptu brunch on our deck (it was unseasonably warm then) which consisted of BLT's with "Dilled" Mayo, Balsamic Strawberry Salad, and Spiced Peach Sodas. It was delicious, and completely relaxing!

This past week, Debs and I decided to poach some eggs. Upon realizing that I had some some beautiful vine ripe tomatoes and dos avocados I decided to incorporate them into the meal. I originally was going to serve the veggies on the side. It was Debs who asked why I didn't just put it all together. [She's a genius]

What did we create? ETA = Egg Tomato Avocado. So amazing! The velvety smoothness of the egg yolk, paired with the nutty flavor of the avocado (which I mashed a little with some lime juice and a pinch of salt) and the fresh, rich flavor of those tomatoes was like a symphony in my mouth!
I do not hesitate to say that brunch, in my house, is here to stay =)
Eat on fellow eaters!
Tuesday, February 8, 2011
Sausage Dip via Brently
Good day Fellow Eaters!
This recipe came to me by way of my good friend, Brently. He makes it in a crock pot, but because we were hungry and since I don't have a crockpot (yet), I adapted the recipe by combining the ingredients on stovetop and then finishing it off in the oven.

Plain Crostinis:
I love this dip! It is so easy to make and it's so yummy! This recipe is easily doubled or tripled depending on how large your group is.
For exact measurements check out this recipe (up soon) on my profile at Food52!
Being in my mid twenties, I often have groups of hungry friends dropping in. Usually it turns into a game night, or movie night, or just a time where we sit around and talk. I love to feed people, but I don't always have money or time to make a full out meal (although that doesn't always stop me). I always look for dishes that are delicous, that are easy to whip up and can serve a lot of people. This is one of those dishes. It's not something you should eat all of the time, because it is very rich, but it's great for every so often and split between a bunch of people.
This recipe came to me by way of my good friend, Brently. He makes it in a crock pot, but because we were hungry and since I don't have a crockpot (yet), I adapted the recipe by combining the ingredients on stovetop and then finishing it off in the oven.

There are three ingredients to this dip:
Cream Cheese
Rotel
Ground Sausage
Leave the Cream cheese out so that it will soften. Cook the sausage in a pan with high sides, making sure there is no pink left. Drain on a plate covered with a papertowel. Give the cooked sausage, rotel, and cream cheese a quick stir in the pan on low heat and then place dip in a casserole dish and bake for about 10 to 15 minutes. This ensures that the dip mixes well and is hot all the way through. Serve warm with home- made crostinis.
 |
| Unbaked Crostinis |
Baguette
Olive Oil
Take a baguette and slice it into 1/4 inch slices (mine were a bit thickes). Place on a baking pan and drizzle with olive oil, turn pieces over so that they are lightly coated with olive oil on each side. Bake at 350 degrees until they are golden.
I love this dip! It is so easy to make and it's so yummy! This recipe is easily doubled or tripled depending on how large your group is.
For exact measurements check out this recipe (up soon) on my profile at Food52!
Saturday, February 5, 2011
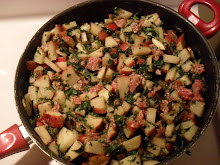
Aubergines Frits
Fried Eggplants = Aubergines Frits
 The other day I was in the produce section of the supermarket and I saw the beautiful purple skin of eggplants. I remembered liking eggplant as a teenager, and suddenly wondered "When is the last time I ate eggplant?".. With that question in mind another one closely followed "Have I ever cooked an eggplant on my own?".. No. I had not. For shame! Eager to reconnect with eggplant, I picked one up and took it home.
I remember Mom cooking eggplant a long time ago and greatly enjoying it both in texture and in flavor. Before she cooked it, she would cover it in salt and let it sit, for a bit, to leech it of it's bitterness(?). So, I followed suit.
 After washing it, I sliced the eggplant into (mostly) even circles . I placed the slices in one layer onto a pan that I had salted, and I covered them with more salt. I let them sit for a half hour and then put them in a colander and rinsed them off. After a quick pat dry, I took the slices to my dredging station.
After they were breaded and had sat in the fridge awhile (so that the coating would set!), I fried them in olive oil and drained them after they had gotten nice and crispy (some of them got a little too crispy...[oops!]). They were so good! Crunchy and flavorful on the outside, because I season my own bread crumbs, and warm and soft on the inside because eggplant is amazing!
I served these up with some delicious saffron and chives couscous that I got from my local Mennonite bulk store (so good!!). Along with roasted sweet potatoes, and fish (those last two will be in another post) it made quite the meal.
 Oh, and the next day my roomie brought home another eggplant, a bigger one this time. I think she wants me to make more! =)
Don't forget to check out my profile on Food52 to learn more about me and to find delicious recipes!!!
Friday, February 4, 2011
Not Mashed Potatoes
Hello Fellow Eaters!
It's crazy how life can get so busy, it just spins you around and a month can pass way too quickly. Between traveling, sickness, heartbreak, and more laughing than any group of friends should be allowed to do, I did manage to keep cooking (not so much during sickness..ugh), but I have missed writing about it. So now I have to back track a bit to my first week home which was right after traveling and sickness.
Heartbreak-
The reason is a long tale that I won't tell here...BUT it caused me to cook so I will tell you about that!
I needed something to be creative with, but I also wanted comfort food. When ever I think of comfort food I think of something warm, buttery, a bit starchy, and flavorful. Well, I didn't want to eat a pot of mashed potatoes so I came up with something slightly more healthy that included potatoes.
 I think I am slightly addicted to using this pie crust (atleast until I learn to make my own, which I hear, [from Crystal P.S.- She is GENIUS!!] is not that difficult at all!) and I decided to use it to make mini tarts. I grabbed my new food processor for it's first time use ever (!!!) and threw in some carrots, onions, and cooked sausage, until it was (not pureed) a nice looking mix. I sauteed all of that in olive oil (and a small bit of the sausage fat, left over from cooking, for flavor) along with spinach, garlic and (TA-DA) some potatoes. During the sauteeing I added some salt, pepper, and a bit of paprika. While I left the mixture to cool a bit, I attended to the dough.
 After rolling the dough out on a floured surface. I turned a cup over and used a knife to trace around the mouth of the cup. I place each little circle into the greased muffin tin, pressing slightly into each cup. I filled each cup with the veggie and sausage mixture and topped with cheese. I alternated between cheddar and muenster. In the ones I topped with cheddar I also layered a small pat of cream cheese between 2 layers of the filling. What I ended up with were these delicious (more healthy than a huge pot of yummy mashed potatoes) miniature pies!

Until next time (which should be sooner rather than later)!
Saturday, January 8, 2011
A "Grown-up" Breakfast
A quick story for my fellow eaters!
After a few minutes of being awake yesterday, I noticed two things 1) It's still winter and 2) I'm hungry. I knew that my sister had gotten a waffle iron as a present, so I texted her (even though she was in the very next room) and said "We should make waffles, I'll make some syrup" (I didn't want to get out from under my covers until there was a plan).
I got down to the beautiful kitchen and decided what I would do. After a bit my Sister came down and we began to cook together. As much as this may sound as if I am being a sap (because I am)- It was really enjoyable. It had been quite a long time since we had cooked together, with me, being away for most of the year. I remember her making pancakes one Saturday morning when we were much younger. I helped by getting the plates, utensils, and juice ready since I wasn't very stove savvy at that age. I remember the warmth of feeling I had towards my sister as we ate, and the sense of pride in having "helped make" breakfast, just the two of us! (Not that I ever told her that, I'm the sap in the family!). Yesterday morning it kind of felt like that again (but with us being older and me being able to cook now...and with coffee!). I love my sister and I love to cook, so the fact that we could do it together was wonderful for me!
Okay, story time is over. On to the cooking!
Anyways, I had had this idea all night: I wanted to make syrup. So, I decided I would. I already knew how to make a simple syrup for the purpose of mixing into drinks (It works well when making large containers of brewed iced tea!) so this should be easy! (..and it was)
Simple Syrup (for use in drinks):
Ingredients:
1 Part Sugar
1 Part Water
OR
2 Part Sugar
1 Part Water
Method:
Combine sugar and water in a medium sauce pan. Turn heat on high and bring to a boil, stirring constantly until all the sugar granules have dissolved. Allow the mixture to cool before using.
For waffles, though, I figured the syrup would have to be a bit more thick than one used for drinking purposes but I didn't want to make it TOO sweet. I also wanted it to be more than just liquid sugar. For these reasons, I decided to use the 1Part Sugar, 1 Part Water ratio and add an extra one-third of a cup of Sugar (next time I may go with a 2 parts sugar, 1 part water ratio just to check it out), a few pinches of Cinnamon, and a dash of Amaretto.

I ended up making the most delicious and warming syrup I have ever tasted. The amaretto gave the syrup a rich almond and fruit flavor and the cinnamon added warmth and a bit of spice. After drizzling the syrup over top of our waffles, and sitting down to eat, it was like being kids again, just more "grown- up".
The Cinnamon Amaretto Syrup tastes amazing over waffles, and probably on pancakes as well, but I wouldn't hesitate to drizzle it over vanilla ice cream, or other desserts. I also plan to try making an Italian style soda with this syrup!
The thing to remember about Simple Syrup is that you can add almost anything to it for flavor! Try different extracts such as vanilla, or fruit oils used for cooking, try herbs such as mint, use edible flowers such as hibiscus or rose, add spice with things like ginger root or cinnamon sticks. Another way to have fun is by using different types of sugar; try brown, or raw sugar for a different taste. Store any extra syrup in a airtight glass jar in the refrigerator.
Just two warnings though: 1) If you are going to use an extract or oil of any kind: add only a drop or two at a time. Extracts are very concentrated and if you add too much it will ruin the taste of your syrup 2) While cooking Simple Syrup use only METAL or WOODEN utensils, wooden is best in my opinion. Sugar gets very, very hot and WILL melt any plastic utensil you use. If you need to taste test your syrup, dip a clean, dry metal teaspoon in and then out, wait for a bit, blow on it, and then taste it. Be careful as it will be very hot!
I love making Simple Syrup, because it is just that- Simple ...and so delicious! I guarantee that you will see more Simple Syrup recipes on this blog in the near future!
Thursday, January 6, 2011
Christmas Cookies!
Happy New Year fellow eaters!
Welcome to 2011!
It has been much too busy lately and I have missed writing. I've been home with the parents for about two weeks visiting with family and friends for the Christmas season. Along with the Christmas season, there has been much Christmas food, many, many Christmas cookies, and yummy Christmas drinks (mmm....Egg Nog and, of course, my Mom's Sorrel). So I have probably gained about 100 pounds which I have resolved to lose in the new year. In all of this I have not actually had to cook much for myself. I do miss it, but at the same time, I have to fill up on Mom's and Lucy's (my best friend's wonderful Step-mom is an amazing chef and always manages to feed me when I come over) food while I have time, but I'm sure once I get back to my little apartment kitchen I will be ready to feed the masses again!
Since I haven't cooked much since being here I will rewind to a Friday right before the "Holiday Rush" began.
So many of us get wrapped up in the rush, and how we're going to get this and that, how will we get where we are going, and how soon will we get there (which was my big worry). Yes, these things may be forefront in our minds, but take a moment to shut it off and think. Unfortunately, some who read this may be jaded enough to write this off as being cliche, but it is good to be reminded that the Christmas season should not be one big commercial about what we can get out of it, but what we can give, and who we can give to. It is even better to realize that not everyone gets to gather with family, in a warm home. Some people don't have a "Merry Little Christmas" or any kind of warm holiday. Those of us who are in more fortunate situations (even if we only have a little more ourselves) should not only be thankful, but we should try to ease the burden, or even bring a little cheer to those who don't have any.
On to the cookies: Crystal surprised me. She said that she was going to bake Whole Wheat Chocolate Chip Cookies with no sugar added applesauce.

The applesauce took the place of a lot of the sugar that would have been used in the cookie. It also took the place of any kind of butter or shortening. I must admit that I was skeptical about these cookies, but they turned out SO good. They tasted great without being too sweet, and stayed rich and moist in texture. These cookies are great for anyone who likes chocolate chip cookies, anyone who has diabetes, and they are good for you. Yes, I said it, these cookies taste good AND are good for you!
I am posting pictures here but you can find the recipe here on Crystal's blog!

I made Cranberry and White Chocolate Chip Cookies. These are delicious and I love the way the cookies look especially around Christmas time, but, they are great for any time of the year! I adapted a recipe that I found online for my own personal use. I like to use 1.5 sticks unsalted butter and 0.5 sticks salted butter.
.

Cranberry and White Chocolate Chip Cookies
You'll need:
2 Sticks of butter
1 Cup of packed brown sugar
1 Cup white sugar
2 Eggs
2 Tablespoons Vanilla Extract
3 Cups all purpose flour
1 Teaspoon baking soda
1 Teaspoon baking soda
1.5 Cups White Chocolate Chips
12 Ounces Dried Cranberries
Method:
Preheat your oven to 375 degrees F (190 degrees C). Prepare cookie sheets. In a large bowl cream together the butter, the brown sugar, and the white sugar until smooth. Beat in the eggs and the vanilla extract.
Combine the flour and baking soda and stir into the sugar mixture. Mix in the white chocolate chips and cranberries. Roll into walnut sized balls and place onto prepared cookie sheets. Flatten top of cookies slightly. Bake for 8- 10 minutes or until the edges of the cookies are golden brown.
Allow to cool on racks.
Share and Enjoy!
Although I am late, I wish each person reading this a Merry Christmas, a Happy Holiday, and a Happy New Year!!!!
Subscribe to:
Posts (Atom)